传感器 · VL53L0X · ToF 激光测距
VL53L0X 激光测距模块 接线与 STM32 实测
STM32F103 通过 I2C 读 VL53L0X 激光测距,距离显示到 OLED、串口同步输出。本页含接线、完整代码、四种状态、芯片参数,全部实测通过,照着做就能复现。和超声波 HC-SR04 怎么选,看「和超声波怎么选」一节。
Quick Facts
- 接口:I2C,地址 0x29(7-bit)
- 实测范围:30 ~ 1200 mm(本项目固件设定)
- 接线:SCL→PB8,SDA→PB9(I2C1 重映射)
- 波长:940 nm VCSEL,人眼不可见
- 视场角:约 25°
- 激光等级:Class 1,人眼安全
Verified
实机验证结果
本项目实测 下面的照片全部来自实拍画面(从拍摄素材截取),不是渲染图。四种状态的文字以烧进板子的固件为准。更新于 2026-08-15。
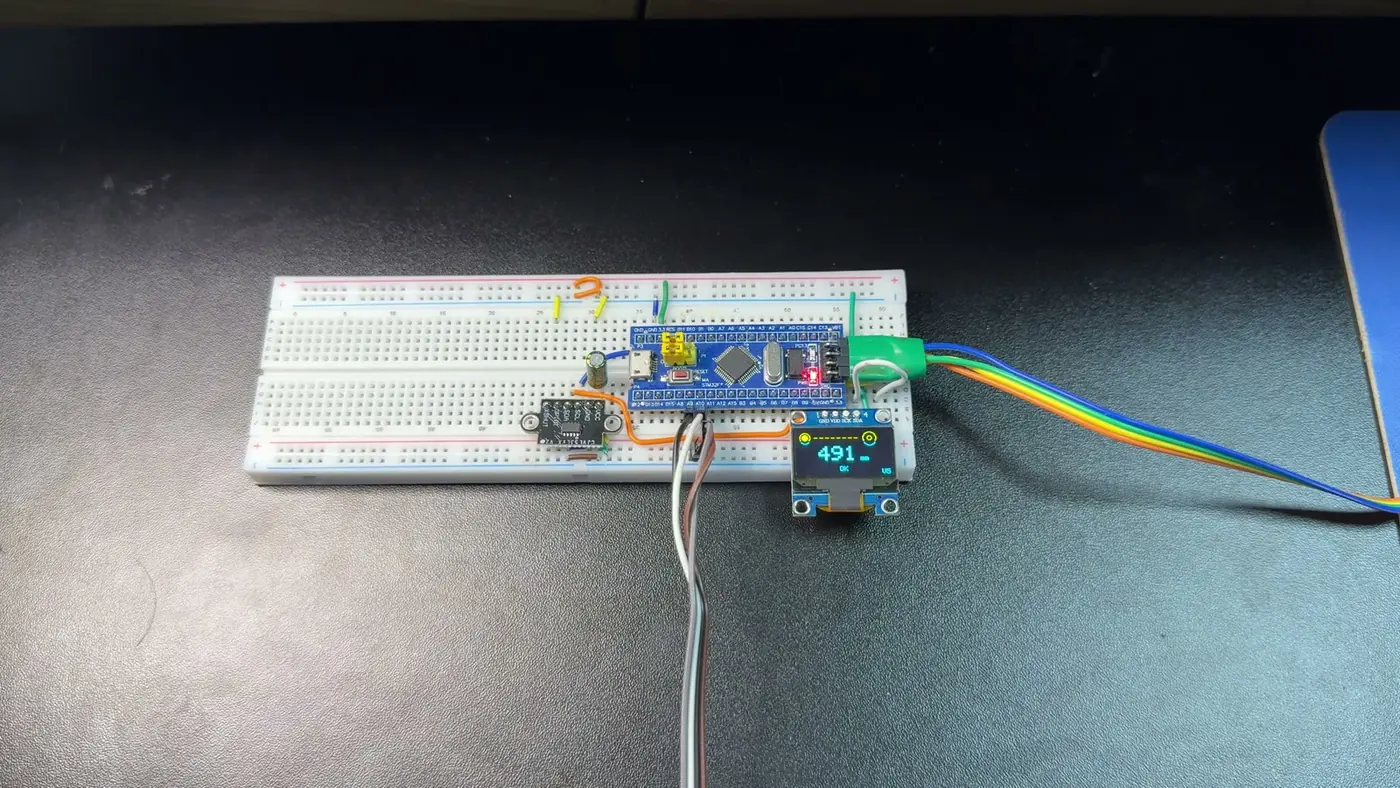
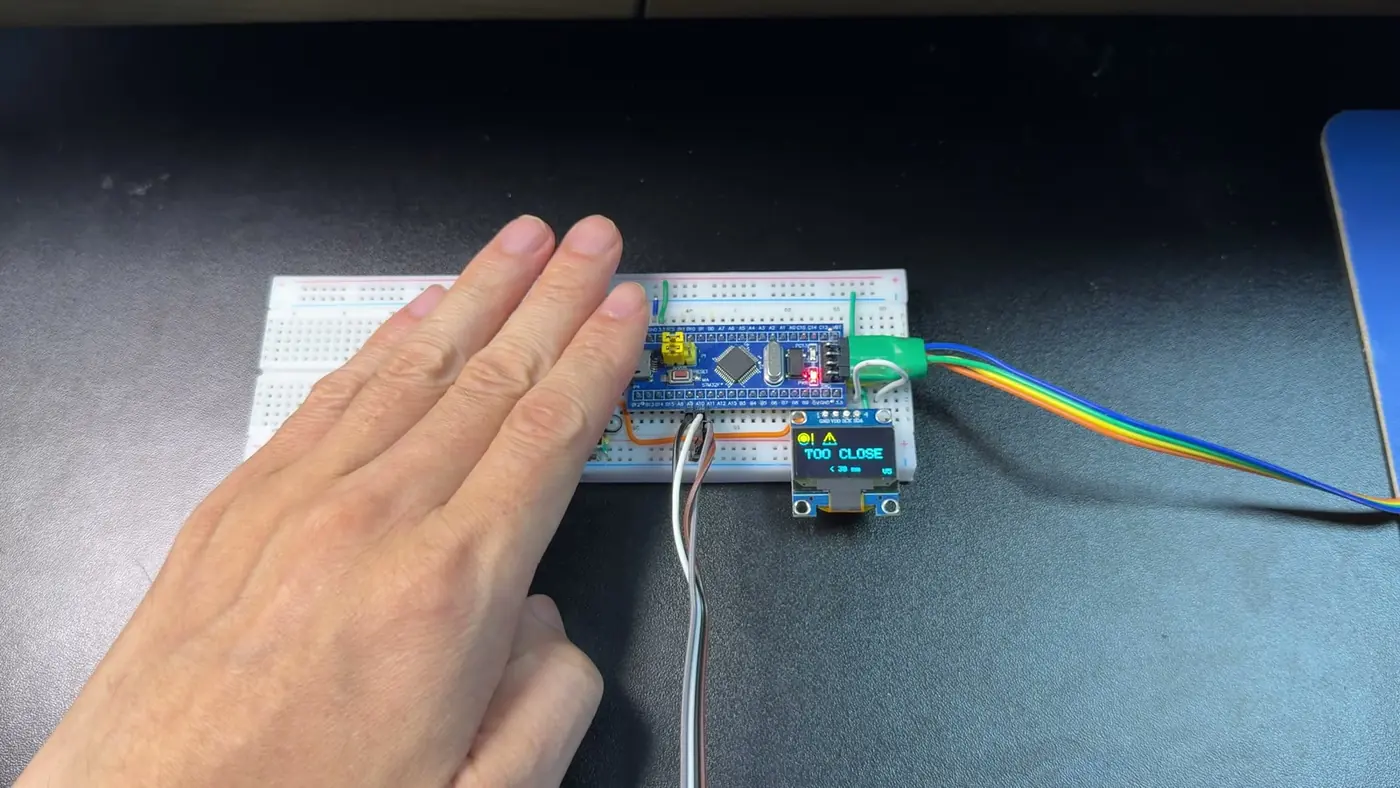
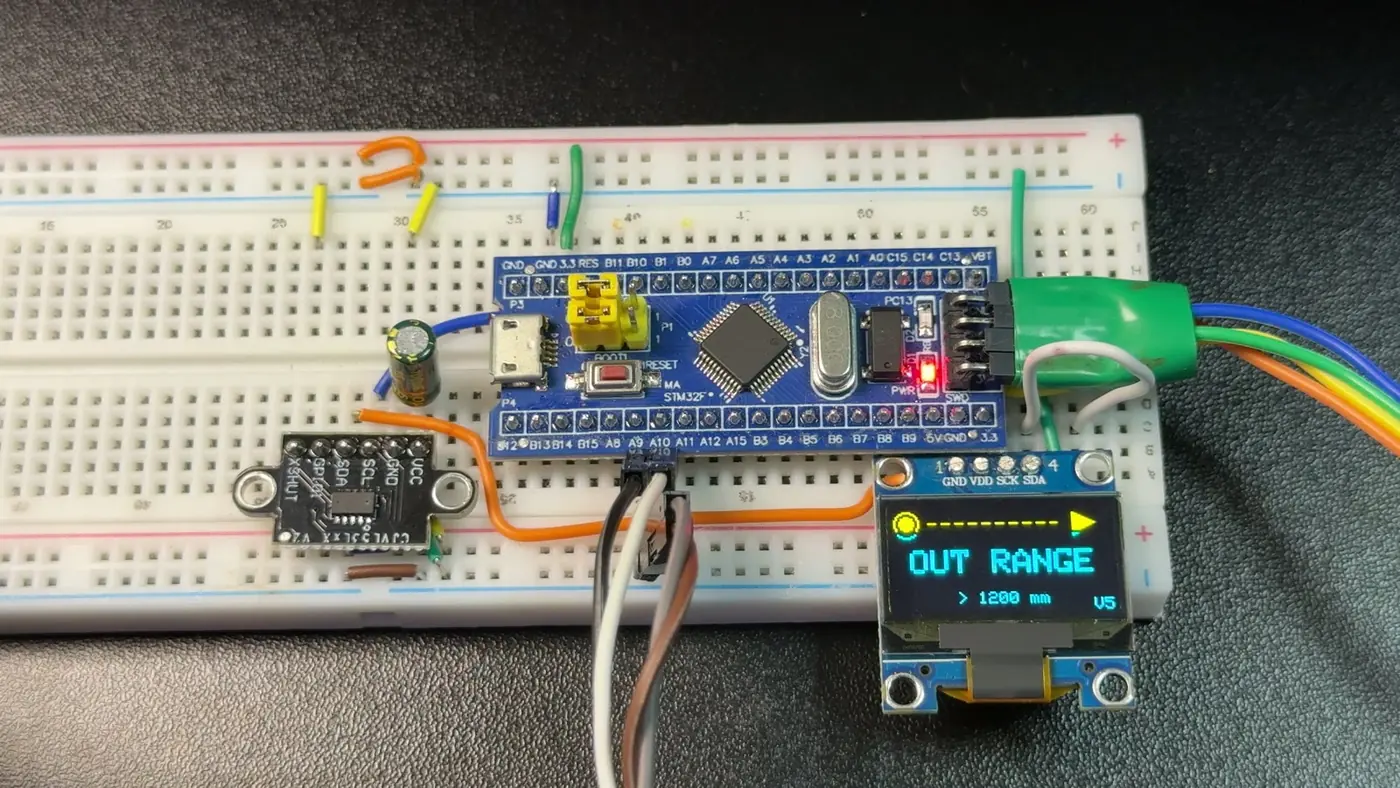
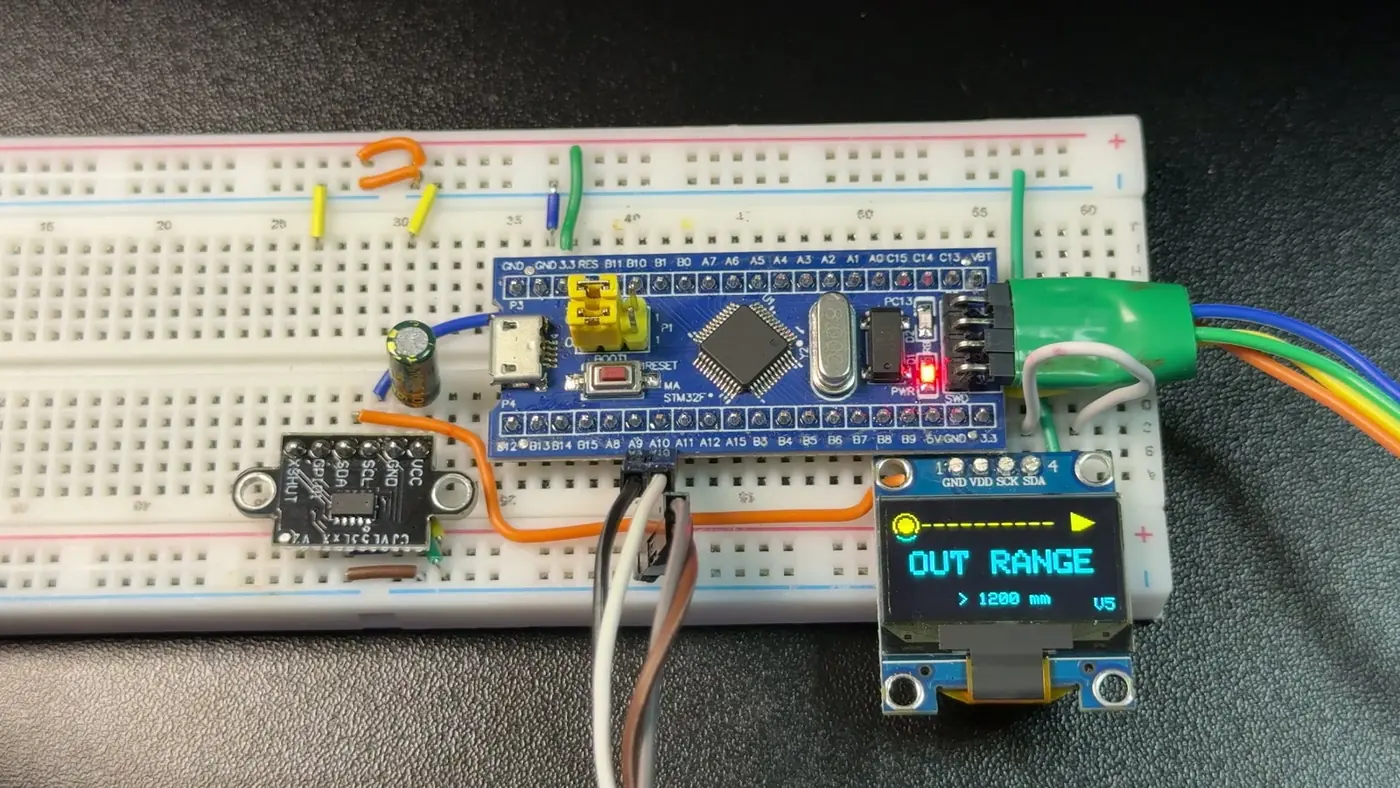
OLED 上的四种状态
固件判断顺序是 超时 → 太近 → 超范围 → 正常。四种状态的屏幕文字:
| 状态 | 第一行 | 第二行 | 含义 |
|---|---|---|---|
| 正常 | OK | (大数字 + mm) | 有效距离,30 ~ 1200 mm(本项目固件设定) |
| 太近 | TOO CLOSE | < 30 mm | 低于 30 mm,读数不可靠(会偏大) |
| 超范围 | OUT RANGE | > 1200 mm | 超过 1200 mm,或无目标 |
| 超时 | TIMEOUT | CHECK I2C | I2C / 测量超时(读数 65535),详见常见故障一节 |
编译烧录记录
PlatformIO 编译无报错;ST-Link 烧录 OpenOCD 回报 ** Verified OK **、[SUCCESS] Took 15.46 seconds;Flash 占用 54.7%、RAM 7.9%。实机上 OLED 四种状态都能正确切换,串口同步输出读数。
| 项目 | 本项目实际使用 |
|---|---|
| 主控 | STM32F103C8T6(BluePill) |
| 模块 | VL53L0X ToF 激光测距模块 |
| 显示 | 0.96 寸 OLED,SSD1306,128×64,地址 0x3C |
| 开发工具 | VS Code + PlatformIO |
| 框架 | Arduino / STM32duino |
| 烧录 | ST-Link |
| 串口 | 115200 |
| 依赖库 | Adafruit SSD1306、Adafruit GFX Library、pololu/VL53L0X |
What it does
这个模块是干什么的
VL53L0X 就是给单片机装一把「激光尺子」。它朝外打一束人眼看不见的红外激光,撞到东西弹回来,芯片算一下光来回花了多长时间,就换算出距离,单位是毫米。单片机拿到这个数,就能自己判断「前面有东西吗、离多远」。
ToF 原理(大白话版)
专业叫法是 ToF(Time-of-Flight,飞行时间)。原理一句话:激光飞出去、撞到东西再弹回来,芯片记下这段「往返」时间,套公式 距离 = 光速 × 往返时间 ÷ 2——除以 2 是因为光走的是来回两趟。打个比方,跟蝙蝠用超声波回声定位一个道理,只不过这里用的是光、不是声音,而且光快得多,所以测一次只要几十毫秒,还测得很细。
它和「靠反射光强度猜距离」的老式红外测距不一样——那种受物体颜色、反光影响很大;ToF 是真量时间,所以对物体颜色、环境光都稳得多。
How to choose
和超声波 HC-SR04 怎么选
客户最常问的就是「我该买激光的还是超声波的」。这张表把两边最要紧的差别摆出来,按你的场景对号入座。
| 维度 | VL53L0X 激光 ToF | HC-SR04 超声波 |
|---|---|---|
| 测量原理 | 激光飞行时间(光速) | 超声波往返时间(声速) |
| 有效量程 | 本项目实测 30 ~ 1200 mm(芯片长距模式可到 2 m) | 约 20 ~ 4000 mm(典型) |
| 精度 / 分辨率 | 毫米级(一般读数更稳) | 厘米级(相对较粗) |
| 盲区 | 本项目设定 < 30 mm | 约 < 20 mm |
| 受环境光影响 | 强光(尤其太阳光)下量程会缩短 | 受光影响小 |
| 受声学噪声影响 | 不受 | 受(多个超声波同用、环境噪声会互相干扰) |
| 对反光面 / 透明物体 | 玻璃、镜面、黑色吸光面测不准 | 反光面对它影响小,透明物体可测 |
| 体积 | 很小(模块约一个指尖大) | 较大(两颗换能器探头) |
要测得细、要毫米级、要装在巴掌大的小设备里 → 选激光 VL53L0X。比如桌面小机器人避障、手势/接近感应、无人机定高、水杯液位。
要量程远(几米)、要便宜、环境有强光或者要隔着透明罩子测 → 选超声波 HC-SR04。比如倒车、门口来人检测、水箱液位。
两者不冲突:很多项目是「远用超声波、近用激光」搭配着用。
超声波一列的量程、盲区等为 HC-SR04 的典型值,本站另有超声波模块的单独资料页;本页只做选型对比,未在本项目里做两者同场实测。资料参考
Wiring
接线
本项目实测 VL53L0X 和 OLED 共用同一组 I2C,一共就几根线,实机跑通。
| 信号 | STM32F103C8T6 | VL53L0X | OLED |
|---|---|---|---|
| 电源 | 3.3V | VIN | VDD |
| 地 | GND | GND | GND |
| 时钟 | PB8 | SCL | SCL / SCK |
| 数据 | PB9 | SDA | SDA |
| 使能 / 复位 | 不接,或 PB0(推荐) | XSHUT | — |
| 中断 | 不接 | GPIO1 | — |
地址
| 模块 | 本项目使用 |
|---|---|
| OLED SSD1306 | 0x3C |
| VL53L0X | 0x29 |
本项目实测这块模块接的是 3.3V——跟 3.3V 逻辑的 STM32 同压最省事。不确定你的板子带不带稳压,就一律接 3.3V 最稳。
Wire.setSCL(PB8) / Wire.setSDA(PB9) 指定,STM32duino 库会自动处理重映射。PB8 只能是 SCL、PB9 只能是 SDA,不能对调。
hardResetSensor())。
| 要点 | 说明 |
|---|---|
| PA13 / PA14 | 留给 ST-Link 调试,不要占用 |
| 30 ~ 1200 mm 是固件设定 | 芯片本身能测更远。太近(< 30 mm)读数偏大不准,太远或无目标会显示 OUT RANGE |
| 按丝印接线 | 按模块丝印判断,不按照片孔位判断 |
Code
完整代码
本项目实测 下面是实际烧进板子、拍视频时运行的那一份 v5 固件,一字未改。环境:VS Code + PlatformIO + Arduino(STM32duino)。
关键处说明
1. 把 I2C 指到 PB8 / PB9。STM32duino 默认的 I2C 脚不是 PB8/PB9,不手动指定就读不到任何东西。
2. XSHUT 硬复位。initSensor() 里先把 PB0 拉低再拉高,给传感器做一次物理断电复位,能根治冷上电卡死(详见常见故障一节)。
3. 滑动平均。每次读数放进 5 个样本的环形缓冲(SAMPLE_N = 5)取平均,让显示的数字不跳。
4. 判断顺序是 超时 → 太近(< 30) → 超范围(> 1200) → 正常,跟上面四种状态一一对应。阈值 MIN_RANGE_MM = 30、MAX_RANGE_MM = 1200 在文件开头。
5. 冷上电自恢复。连续超时 3 次(REINIT_THRESHOLD = 3)就自动重新 init。
platformio.ini · 工程配置
[platformio]

[env:bluepill_f103c8]
platform = ststm32
board = bluepill_f103c8
framework = arduino
upload_protocol = stlink
monitor_speed = 115200
lib_deps =
  adafruit/Adafruit SSD1306
  adafruit/Adafruit GFX Library
  pololu/VL53L0X
main.cpp · VL53L0X v5 四屏动画版
/*
 * ==================== FIRMWARE ====================
 * Project: 03_VL53L0X
 * Board: STM32F103C8T6 / BluePill
 * Firmware: VL53L0X v5 四屏动画版
 * Sensor: VL53L0X ToF 激光测距 (I2C 0x29)
 * Display: 0.96 OLED SSD1306 128x64 (I2C 0x3C)
 * Date: 2026-08-15
 *
 * v5 changes (animated 4-screen UI, on top of v4):
 * - marching dashed "signal" rays
 * - blinking warning triangle / off-screen arrow
 * - pulsing target ring
 *
 * Ranging/init code (I2C PB8/PB9, VL53L0X 0x29, OLED 0x3C, averaging,
 * cold-power recovery) is unchanged from v3.
 * ==================================================
 */

#include <Arduino.h>
#include <Adafruit_GFX.h>
#include <Adafruit_SSD1306.h>
#include <VL53L0X.h>
#include <Wire.h>

constexpr uint8_t OLED_ADDR = 0x3C;
constexpr uint8_t VL53L0X_ADDR = 0x29;
constexpr int SCREEN_WIDTH = 128;
constexpr int SCREEN_HEIGHT = 64;
constexpr char FW_VERSION[] = "VL53L0X v5";
constexpr uint16_t MIN_RANGE_MM = 30;      // below this -> TOO CLOSE
constexpr uint16_t MAX_RANGE_MM = 1200;    // above this -> OUT RANGE
constexpr uint8_t SAMPLE_N = 5;            // rolling-average window
constexpr uint16_t TIMEOUT_MS = 150;       // per-read timeout
constexpr uint8_t REINIT_THRESHOLD = 3;    // timeouts before re-init
constexpr uint8_t XSHUT_PIN = PB0;         // wire XSHUT here for a hard reset

Adafruit_SSD1306 display(SCREEN_WIDTH, SCREEN_HEIGHT, &Wire, -1);
VL53L0X lox;

uint16_t g_samples[SAMPLE_N] = {0};
uint8_t g_sampleIdx = 0;
uint8_t g_sampleCount = 0;
uint8_t g_timeoutCount = 0;
uint16_t g_frame = 0;      // animation phase counter, incremented each loop

// ---------------- ranging helpers (unchanged) ----------------

bool i2cDeviceFound(uint8_t address) {
  Wire.beginTransmission(address);
  return Wire.endTransmission() == 0;
}

void pushSample(uint16_t v) {
  g_samples[g_sampleIdx] = v;
  g_sampleIdx = (g_sampleIdx + 1) % SAMPLE_N;
  if (g_sampleCount < SAMPLE_N) {
    g_sampleCount++;
  }
}

uint16_t averageSamples() {
  uint32_t sum = 0;
  for (uint8_t i = 0; i < g_sampleCount; i++) {
    sum += g_samples[i];
  }
  return static_cast<uint16_t>(sum / g_sampleCount);
}

void resetSamples() {
  g_sampleIdx = 0;
  g_sampleCount = 0;
}

void hardResetSensor() {
  pinMode(XSHUT_PIN, OUTPUT);
  digitalWrite(XSHUT_PIN, LOW);
  delay(10);
  digitalWrite(XSHUT_PIN, HIGH);
  delay(10);
}

bool initSensor() {
  hardResetSensor();
  if (!lox.init()) {
    return false;
  }
  lox.setTimeout(TIMEOUT_MS);
  lox.setMeasurementTimingBudget(33000);
  lox.startContinuous();

  uint16_t test = lox.readRangeContinuousMillimeters();
  return !lox.timeoutOccurred();
}

// ---------------- display helpers (new UI) ----------------

// Draw centered text using the built-in 6x8 font (6*size px per char).
void drawCentered(const char *s, int16_t y, uint8_t size) {
  display.setTextSize(size);
  int16_t w = static_cast<int16_t>(strlen(s)) * 6 * size;
  display.setCursor((SCREEN_WIDTH - w) / 2, y);
  display.print(s);
}

// Small "sensor" = filled lens + one emission ring.
void drawSensor(int16_t cx, int16_t cy) {
  display.fillCircle(cx, cy, 4, SSD1306_WHITE);
  display.drawCircle(cx, cy, 7, SSD1306_WHITE);
}

// Warning triangle with a "!" inside, centered at (cx, cy).
void drawWarning(int16_t cx, int16_t cy) {
  display.drawTriangle(cx, cy - 8, cx - 9, cy + 7, cx + 9, cy + 7, SSD1306_WHITE);
  display.drawLine(cx, cy - 4, cx, cy + 2, SSD1306_WHITE);
  display.drawPixel(cx, cy + 5, SSD1306_WHITE);
}

// Animated dashed line from x0 to x1 at height y.
void drawMarchingDash(int16_t x0, int16_t x1, int16_t y, uint8_t phase) {
  for (int16_t x = x0 - 8 + phase; x <= x1; x += 8) {
    int16_t e = x + 4;
    if (e > x1) {
      e = x1;
    }
    if (x >= x0) {
      display.drawLine(x, y, e, y, SSD1306_WHITE);
    }
  }
}

// Blink helper: true for `onFrames` frames of every `period` frames.
bool blinkOn(uint8_t period, uint8_t onFrames) {
  return (g_frame % period) < onFrames;
}

// Version label in the bottom-right corner.
void drawVersionLabel() {
  display.setTextSize(1);
  display.setCursor(116, 56);
  display.print("V5");
}

// 1. Normal distance: sensor -> target icon + big number + OK.
void showNormal(uint16_t mm) {
  display.clearDisplay();
  display.setTextColor(SSD1306_WHITE);

  const int16_t y = 11;
  drawSensor(10, y);
  drawMarchingDash(22, 86, y, g_frame % 8);
  uint8_t ring = 8 + ((g_frame >> 3) & 1);
  display.drawCircle(100, y, ring, SSD1306_WHITE);
  display.drawCircle(100, y, 3, SSD1306_WHITE);

  uint8_t digits = (mm >= 1000) ? 4 : (mm >= 100) ? 3 : 2;
  display.setTextSize(3);
  int16_t numW = digits * 18;
  int16_t totalW = numW + 4 + 12;
  int16_t startX = (SCREEN_WIDTH - totalW) / 2;
  display.setCursor(startX, 22);
  display.print(mm);

  display.setTextSize(1);
  display.setCursor(startX + numW + 4, 36);
  display.print("mm");

  drawCentered("OK", 52, 1);
  drawVersionLabel();
  display.display();
}

// 2. Too close (< 30 mm): sensor + close object + warning.
void showTooClose() {
  display.clearDisplay();
  display.setTextColor(SSD1306_WHITE);

  const int16_t y = 11;
  drawSensor(8, y);
  display.drawLine(20, y - 7, 20, y + 7, SSD1306_WHITE);
  if (blinkOn(8, 5)) {
    drawWarning(44, y);
  }

  drawCentered("TOO CLOSE", 26, 2);
  drawCentered("< 30 mm", 52, 1);
  drawVersionLabel();
  display.display();
}

// 3. Out of range (> 1200 mm / no target).
void showOutRange() {
  display.clearDisplay();
  display.setTextColor(SSD1306_WHITE);

  const int16_t y = 11;
  drawSensor(8, y);
  drawMarchingDash(18, 96, y, g_frame % 8);
  if (blinkOn(8, 5)) {
    display.fillTriangle(106, y - 6, 106, y + 6, 118, y, SSD1306_WHITE);
  }

  drawCentered("OUT RANGE", 26, 2);
  drawCentered("> 1200 mm", 52, 1);
  drawVersionLabel();
  display.display();
}

// 4. Timeout: warning triangle + broken line + TIMEOUT / CHECK I2C.
void showTimeout() {
  display.clearDisplay();
  display.setTextColor(SSD1306_WHITE);

  if (blinkOn(8, 5)) {
    drawWarning(64, 8);
  }

  int16_t lineY = 19;
  display.drawLine(12, lineY, 42, lineY, SSD1306_WHITE);
  int16_t xx = 52;
  if (blinkOn(4, 2)) {
    display.drawLine(xx - 3, lineY - 3, xx + 3, lineY + 3, SSD1306_WHITE);
    display.drawLine(xx - 3, lineY + 3, xx + 3, lineY - 3, SSD1306_WHITE);
  }
  display.drawLine(62, lineY, 90, lineY, SSD1306_WHITE);
  display.setCursor(96, lineY - 4);
  display.print("I2C");

  drawCentered("TIMEOUT", 30, 2);
  drawCentered("CHECK I2C", 52, 1);
  drawVersionLabel();
  display.display();
}

// Boot/status text screen (kept from v3).
void showStatus(const char *line1, const char *line2) {
  display.clearDisplay();
  display.setTextColor(SSD1306_WHITE);
  display.setTextSize(1);
  display.setCursor(0, 0);
  display.println(FW_VERSION);
  display.println();
  display.println(line1);
  display.println(line2);
  display.display();
}

// ---------------- setup / loop ----------------

void setup() {
  Serial.begin(115200);
  delay(300);

  Wire.setSCL(PB8);
  Wire.setSDA(PB9);
  Wire.begin();
  Wire.setClock(100000);

  if (!display.begin(SSD1306_SWITCHCAPVCC, OLED_ADDR)) {
    Serial.println("OLED init failed");
    while (true) {
      delay(1000);
    }
  }

  showStatus("OLED OK", "VL53L0X init...");
  Serial.println(FW_VERSION);

  Serial.print("OLED 0x3C: ");
  Serial.println(i2cDeviceFound(OLED_ADDR) ? "found" : "not found");
  Serial.print("VL53L0X 0x29: ");
  Serial.println(i2cDeviceFound(VL53L0X_ADDR) ? "found" : "not found");

  // Give the VL53L0X module's onboard regulator extra time to stabilize
  // after a cold power-on (BH1750/SHT30 don't need this — no regulator/laser).
  delay(500);

  if (!initSensor()) {
    Serial.println("VL53L0X warm-up failed, retrying...");
    delay(300);
    if (!initSensor()) {
      showStatus("VL53L0X failed", "Check wiring");
      Serial.println("VL53L0X init failed");
      while (true) {
        delay(1000);
      }
    }
  }

  // Re-init the OLED after the sensor's VCSEL calibration.
  delay(50);
  display.begin(SSD1306_SWITCHCAPVCC, OLED_ADDR);

  showStatus("VL53L0X ready", "PB8/PB9 I2C");
  Serial.println("VL53L0X ready");
}

void loop() {
  g_frame++;
  uint16_t mm = lox.readRangeContinuousMillimeters();

  if (lox.timeoutOccurred()) {
    resetSamples();
    g_timeoutCount++;
    if (g_timeoutCount >= REINIT_THRESHOLD) {
      g_timeoutCount = 0;
      initSensor();
    }
    showTimeout();
    Serial.println("timeout");
  } else if (mm < MIN_RANGE_MM) {
    g_timeoutCount = 0;
    resetSamples();
    showTooClose();
    Serial.println("too close");
  } else if (mm > MAX_RANGE_MM) {
    g_timeoutCount = 0;
    resetSamples();
    showOutRange();
    Serial.println("out of range");
  } else {
    g_timeoutCount = 0;
    pushSample(mm);
    uint16_t avg = averageSamples();
    showNormal(avg);
    Serial.print("distance: ");
    Serial.print(avg);
    Serial.println(" mm");
  }

  delay(50);
}
依赖库:Adafruit SSD1306、Adafruit GFX Library、pololu/VL53L0X,都在 platformio.ini 的 lib_deps 里,用 PlatformIO 打开工程会自动下载,不用手动装。
Modes
VL53L0X 的几种测距模式
资料参考 客户拿到模块后第二个会问的问题:怎么在「测得快 / 测得准 / 测得远」之间权衡。
| 模式 | 测量时间 | 量程 | 精度 | 什么时候用 |
|---|---|---|---|---|
| 默认(本项目用这个) | 约 33 ms | 约 1.2 m | 够用 | 日常测距、学习,最省事 |
| 高精度 | 约 200 ms | 约 1.2 m | 最好 | 要求读数特别稳、可以慢慢测的场景 |
| 长距离 | 约 33 ms | 约 2 m | 一般,噪声大 | 需要测到 1.2 m 以上、能接受读数跳 |
| 高速 | 约 20 ms | 约 1.2 m | 一般 | 要刷得飞快、量程不远就够 |
在库里的做法:setMeasurementTimingBudget() 设「测量时间」,setSignalRateLimit() 设「信号下限」。测量时间越长越准(等于多测几次取平均);信号下限调低能量程变远,但更容易把噪声当信号、读数变跳。本项目固件用的就是默认档:setMeasurementTimingBudget(33000)(33 ms),没改信号下限。
Troubleshooting
常见故障和使用限制
下面标「实测」的是我们自己遇到过的,其余是从手册和公开资料整理、未在本项目实物验证。
屏幕出现 TIMEOUT / CHECK I2C
本项目实测 这是固件的第 4 屏,代表 I2C 或测量超时(读数是 65535),不是正常的测距结果。常见于两种情况:
- 冷上电现象(实测可复现)。模块断电再插后,可能先显示几秒 TIMEOUT,随后自动恢复正常读数。这是实测观察到的现象,不是故障。同样的现象在 BH1750、SHT30 这类没有激光的传感器上没出现过。
- 真故障。线接错、地址不对、XSHUT 误接 GND 把传感器关掉了,都会一直超时。
固件做了两层保护:软件上连续超时 3 次自动重新 init;硬件上把 XSHUT 接到 PB0(推荐),每次上电/恢复时先拉低再拉高做物理断电复位,能根治冷上电卡死。当前 XSHUT 悬空也能用,但接上 PB0 最稳。
强环境光(尤其太阳光)下量程会缩短
资料参考 VL53L0X 靠接收自己打出去的 940 nm 激光反射来测距。太阳光里也有大量红外成分,会把信号「淹没」,所以直射阳光下量程明显下降、甚至读不到。室内灯光影响很小。户外用要留意。
玻璃、镜面、黑色吸光材料测不准
资料参考 镜面会把激光反射到别处、不一定弹回来;玻璃会透过去(激光直接穿过去打到后面);黑色粗糙面会把光吸收掉,反射回来的太弱。这三类表面读数可能跳、偏大,甚至直接 OUT RANGE。
多个 VL53L0X 接一条 I2C 会地址冲突
资料参考 VL53L0X 默认地址都是 0x29,直接并两个上去,总线上就撞了。标准做法是靠 XSHUT 逐个使能再改地址:先把所有 XSHUT 拉低,一次只放开一个,改完它的地址再放开下一个。
这条正好和接线里 XSHUT 那段呼应——XSHUT 不只是复位,还是多模块时的「选片」脚。
Reference
芯片级参数
资料参考 下面是芯片本身的参数,全部来自 ST 官方数据手册,不掺网店描述。
| 参数 | 数值 | 来源 |
|---|---|---|
| 芯片型号 | VL53L0X(ST 意法半导体) | 数据手册 |
| 封装 | Optical LGA12,4.4 × 2.4 × 1.0 mm | 数据手册 |
| 供电电压 | 2.6 ~ 3.5 V(单电源) | 数据手册 |
| 量程 | 最高约 2 m(长距离模式);默认档约 1.2 m | 数据手册 / API 手册 |
| 视场角 FoV | 约 25° | 数据手册 |
| 激光波长 | 940 nm(VCSEL,人眼不可见红外) | 数据手册 |
| 激光等级 | Class 1(IEC 60825-1:2014,人眼安全) | 数据手册 |
| I2C 速率 | 最高 400 kHz(Fast mode) | 数据手册 |
| I2C 地址 | 默认 0x29(7-bit,可编程) | 实测 + 数据手册 |
| 接口 | I2C + XSHUT(复位/选片)+ GPIO1(中断) | 数据手册 |
0x52,那是带读写位的 8-bit 地址(7-bit 的 0x29 左移一位:0x29 << 1 = 0x52)。Arduino 的 Wire 和本项目代码都用 7-bit 的 0x29,两者是同一个东西,别被手册里的 0x52 绕晕。
数据手册出处:ST《VL53L0X World smallest Time-of-Flight ranging and gesture detection sensor》(DS11795),官网可下载。测距模式详见《VL53L0X API user manual》(UM2039)。
Download
下载与烧录
本页代码框里的两份文件可以直接复制走。推荐用 PlatformIO 打开整个工程文件夹,一条命令就编译。
第一次上手步骤
- 按接线表接好:3.3V、GND、PB8、PB9(VL53L0X 和 OLED 共用),XSHUT 推荐接 PB0
- 用 VS Code + PlatformIO 打开整个项目文件夹(不要只复制 main.cpp)
- 等依赖库自动装完,点 Build,看到 SUCCESS
- 接上 ST-Link(SWDIO→PA13、SWCLK→PA14、3.3V、GND),点 Upload,看到
** Verified OK ** - 看 OLED:先是启动画面,然后是距离读数。手移近移远,读数跟着变;贴近到 30 mm 内切到 TOO CLOSE,对着远处/空处切到 OUT RANGE
pio device list,不要照抄我们截图里的 COM 号。
References
资料来源
本页信息来源声明
| 内容 | 来源 |
|---|---|
| 接线、地址、代码、四种状态、固件设定范围 30~1200 mm、编译烧录记录、配图 | 本项目实测 2026-08-15 实机测试 |
| 芯片封装、供电、量程 2 m、视场角 25°、940 nm、Class 1、I2C 地址 | 资料参考 ST 官方数据手册 DS11795 |
| 测距模式(高精度 / 长距离 / 高速的时间与量程) | 资料参考 ST API 手册 UM2039 + Pololu VL53L0X 库文档 |
| 和超声波 HC-SR04 的选型对比(超声波一列) | 资料参考 公开典型参数,本站另有超声波单独资料页 |
| 强光、玻璃/镜面/黑色吸光、多模块地址冲突 | 资料参考 手册与公开资料,未在本项目实物验证 |
| SKU | 待补充 |
| 距离标定 | 未做,数值只作功能验证 |
本页所有「资料参考」内容均由我们重新用自己的话表述,未直接复制原文。芯片参数以你手上模块的实际批次为准。